今天,我们来学习中介模式。跟命令模式、解释器模式类似,中介模式也属于不怎么常用的模式,应用场景比较特殊、有限,但是,跟它俩不同的是,中介模式理解起来并不难,代码实现也非常简单,学习难度要小很多。如果你对中介模式有所了解,你可能会知道,中介模式跟之前讲过的观察者模式有点相似,所以,今天我们还会详细讨论下这两种模式的区别。
中介模式的原理和实现
中介模式的英文翻译是 Mediator Design Pattern。在 GoF 中的《设计模式》一书中,它是这样定义的:中介模式定义了一个单独的(中介)对象,来封装一组对象之间的交互。 将这组对象之间的交互委派给与中介对象交互,来避免对象之间的直接交互。
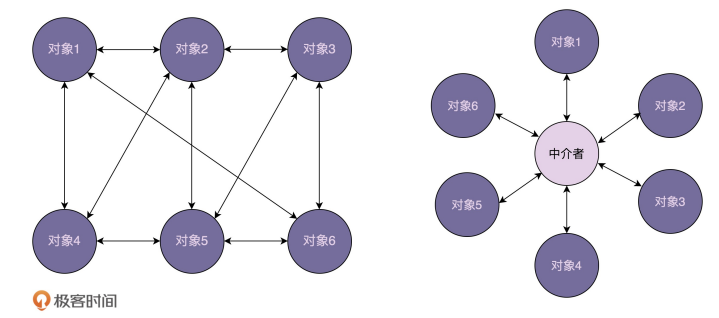
实际上,中介模式的设计思想跟中间层很像,通过引入中介这个中间层,将一组对象之间的交互关系(或者说依赖关系)从多对多(网状关系)转换为一对多(星状关系)。原来一个对象要跟 n 个对象交互,现在只需要跟一个中介对象交互,从而最小化对象之间的交互关系,降低了代码的复杂度,提高了代码的可读性和可维护性。
这里我画了一张对象交互关系的对比图。其中,右边的交互图是利用中介模式对左边交互关系优化之后的结果,从图中我们可以很直观地看出,右边的交互关系更加清晰、简洁。

提到中介模式,有一个比较经典的例子不得不说,那就是航空管制。为了让飞机在飞行的时候互不干扰,每架飞机都需要知道其他飞机每时每刻的位置,这就需要时刻跟其他飞机通信。飞机通信形成的通信网络就会无比复杂。这个时候,我们通过引入“塔台”这样一个中介,让每架飞机只跟塔台来通信,发送自己的位置给塔台,由塔台来负责每架飞机的航线调度。这样就大大简化了通信网络。
刚刚举的是生活中的例子,我们再举一个跟编程开发相关的例子。这个例子与 UI 控件有关,算是中介模式比较经典的应用,很多书籍在讲到中介模式的时候,都会拿它来举例。
假设我们有一个比较复杂的对话框,对话框中有很多控件,比如按钮、文本框、下拉框等。 当我们对某个控件进行操作的时候,其他控件会做出相应的反应,比如,我们在下拉框中选择“注册”,注册相关的控件就会显示在对话框中。如果我们在下拉框中选择“登录”,登录相关的控件就会显示在对话框中。
按照通常我们习惯的 UI 界面的开发方式,我们将刚刚的需求用代码实现出来,就是下面这个样子。在这种实现方式中,控件和控件之间互相操作、互相依赖。
1
2
3
4
5
6
7
8
9
10
11
12
13
14
15
16
17
18
19
20
21
22
23
24
25
26
27
28
29
30
31
32
33
34
35
36
37
38
39
| public class UIControl {
private static final String LOGIN_BTN_ID = "login_btn";
private static final String REG_BTN_ID = "reg_btn";
private static final String USERNAME_INPUT_ID = "username_input";
private static final String PASSWORD_INPUT_ID = "pswd_input";
private static final String REPEATED_PASSWORD_INPUT_ID = "repeated_pswd_input";
private static final String HINT_TEXT_ID = "hint_text";
private static final String SELECTION_ID = "selection";
public static void main(String[] args) {
Button loginButton = (Button) findViewById(LOGIN_BTN_ID);
Button regButton = (Button) findViewById(REG_BTN_ID);
Input usernameInput = (Input) findViewById(USERNAME_INPUT_ID);
Input passwordInput = (Input) findViewById(PASSWORD_INPUT_ID);
Input repeatedPswdInput = (Input) findViewById(REPEATED_PASSWORD_INPUT_ID);
Text hintText = (Text) findViewById(HINT_TEXT_ID);
Selection selection = (Selection) findViewById(SELECTION_ID);
loginButton.setOnClickListener(new OnClickListener() {
@Override
public void onClick(View v) {
String username = usernameInput.text();
String password = passwordInput.text();
}
});
regButton.setOnClickListener(new OnClickListener() {
@Override
public void onClick(View v) {
}
});
}
}
|
我们再按照中介模式,将上面的代码重新实现一下。在新的代码实现中,各个控件只跟中介对象交互,中介对象负责所有业务逻辑的处理。
1
2
3
4
5
6
7
8
9
10
11
12
13
14
15
16
17
18
19
20
21
22
23
24
25
26
27
28
29
30
31
32
33
34
35
36
37
38
39
40
41
42
43
44
45
46
47
48
49
50
51
52
53
54
55
56
57
58
59
60
61
62
63
64
65
66
67
68
69
70
71
72
73
74
75
76
77
78
79
|
public interface Mediator {
void handleEvent(Component component, String event);
}
public class LandingPageDialog implements Mediator {
private Button loginButton;
private Button regButton;
private Selection selection;
private Input usernameInput;
private Input passwordInput;
private Input repeatedPswdInput;
private Text hintText;
@Override
public void handleEvent(Component component, String event) {
if (component.equals(loginButton)) {
String username = usernameInput.text();
String password = passwordInput.text();
} else if (component.equals(regButton)) {
} else if (component.equals(selection)) {
String selectedItem = selection.select();
if (selectedItem.equals("login")) {
usernameInput.show();
passwordInput.show();
repeatedPswdInput.hide();
hintText.hide();
} else if (selectedItem.equals("register")) {
}
}
}
}
public class UIControl {
private static final String LOGIN_BTN_ID = "login_btn";
private static final String REG_BTN_ID = "reg_btn";
private static final String USERNAME_INPUT_ID = "username_input";
private static final String PASSWORD_INPUT_ID = "pswd_input";
private static final String REPEATED_PASSWORD_INPUT_ID = "repeated_pswd_input";
private static final String HINT_TEXT_ID = "hint_text";
private static final String SELECTION_ID = "selection";
public static void main(String[] args) {
Button loginButton = (Button)findViewById(LOGIN_BTN_ID);
Button regButton = (Button)findViewById(REG_BTN_ID);
Input usernameInput = (Input)findViewById(USERNAME_INPUT_ID);
Input passwordInput = (Input)findViewById(PASSWORD_INPUT_ID);
Input repeatedPswdInput = (Input)findViewById(REPEATED_PASSWORD_INPUT_ID);
Text hintText = (Text)findViewById(HINT_TEXT_ID);
Selection selection = (Selection)findViewById(SELECTION_ID);
Mediator dialog = new LandingPageDialog();
dialog.setLoginButton(loginButton);
dialog.setRegButton(regButton);
dialog.setUsernameInput(usernameInput);
dialog.setPasswordInput(passwordInput);
dialog.setRepeatedPswdInput(repeatedPswdInput);
dialog.setHintText(hintText);
dialog.setSelection(selection);
loginButton.setOnClickListener(new OnClickListener() {
@Override
public void onClick(View v) {
dialog.handleEvent(loginButton, "click");
}
});
regButton.setOnClickListener(new OnClickListener() {
@Override
public void onClick(View v) {
dialog.handleEvent(regButton, "click");
}
});
}
}
|
从代码中我们可以看出,原本业务逻辑会分散在各个控件中,现在都集中到了中介类中。实际上,这样做既有好处,也有坏处。好处是简化了控件之间的交互,坏处是中介类有可能会变成大而复杂的“上帝类”(God Class)。所以,在使用中介模式的时候,我们要根据实际的情况,平衡对象之间交互的复杂度和中介类本身的复杂度。
中介模式 VS 观察者模式
前面讲观察者模式的时候,我们讲到,观察者模式有多种实现方式。虽然经典的实现方式没法彻底解耦观察者和被观察者,观察者需要注册到被观察者中,被观察者状态更新需要调用观察者的 update() 方法。但是,在跨进程的实现方式中,我们可以利用消息队列实现彻底解耦,观察者和被观察者都只需要跟消息队列交互,观察者完全不知道被观察者的存在,被观察者也完全不知道观察者的存在。
我们前面提到,中介模式也是为了解耦对象之间的交互,所有的参与者都只与中介进行交互。而观察者模式中的消息队列,就有点类似中介模式中的“中介”,观察者模式的中观察者和被观察者,就有点类似中介模式中的“参与者”。那问题来了:中介模式和观察者模式的区别在哪里呢?什么时候选择使用中介模式?什么时候选择使用观察者模式呢?
在观察者模式中,尽管一个参与者既可以是观察者,同时也可以是被观察者,但是,大部分情况下,交互关系往往都是单向的,一个参与者要么是观察者,要么是被观察者,不会兼具两种身份。也就是说,在观察者模式的应用场景中,参与者之间的交互关系比较有条理。
而中介模式正好相反。只有当参与者之间的交互关系错综复杂,维护成本很高的时候,我们才考虑使用中介模式。毕竟,中介模式的应用会带来一定的副作用,前面也讲到,它有可能会产生大而复杂的上帝类。除此之外,如果一个参与者状态的改变,其他参与者执行的操作有一定先后顺序的要求,这个时候,中介模式就可以利用中介类,通过先后调用不同参与者的方法,来实现顺序的控制,而观察者模式是无法实现这样的顺序要求的。
