0%

(四) SpringBoot-web

1. 静态资源

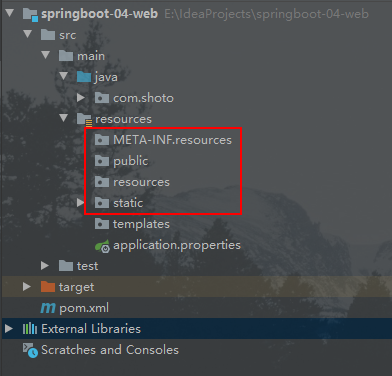
默认情况下,SpringBoot 支持映射获取当前项目下的任何静态资源,其中静态资源需要放在特定的静态资源文件夹下,如所示:

1
2
3
4
"classpath:/META-INF/resources/", 
"classpath:/resources/",
"classpath:/static/",
"classpath:/public/"

静态资源文件夹

这些静态资源文件夹的定义在 org.springframework.boot.autoconfigure.web.ResourceProperties 中便有体现,具体如下所示:

1
2
3
4
5
6
7
8
9
@ConfigurationProperties(
prefix = "spring.resources",
ignoreUnknownFields = false
)
public class ResourceProperties {
private static final String[] CLASSPATH_RESOURCE_LOCATIONS = new String[]{"classpath:/META-INF/resources/", "classpath:/resources/", "classpath:/static/", "classpath:/public/"};
private String[] staticLocations;
...
}

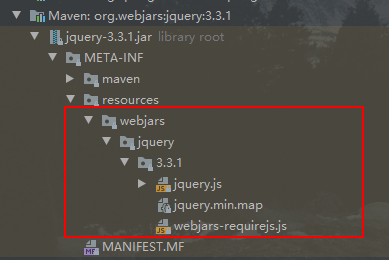
如果我们要访问 jar 中的静态资源(webjars 中的资源),那么我们需要去对应 jar 中的 classpath:/META-INF/resources/webjars/ 路径下找资源。我们以访问 jquery/3.3.1/jquery.js 为例。

首先我们需要导入 JQuery 的依赖,具体如下所示:

1
2
3
4
5
 <dependency>
<groupId>org.webjars</groupId>
<artifactId>jquery</artifactId>
<version>3.3.1</version>
</dependency>

具体目录结构

在访问 jar 包中的资源的时候我们只需要写 webjars 下面资源的名称即可,例如访问路径为 localhost:8080/webjars/jquery/3.3.1/jquery.js ,浏览器上便可以显示 jquery.js 的数据。

2. 欢迎页面

SpringBoot 支持自动识别静态资源文件夹下的欢迎页面 index.html。当我们请求路径为 localhost:8080/的时候,在存在 index.html 的情况下会显示该页面。

3. 网站图标

与其他静态资源一样,Spring Boot 在已配置的静态文件夹中查找 favicon.ico。如果存在这样的文件,它将自动用作应用程序的图标。

4. 模板引擎

Thymeleaf 是一款用于渲染 XML/XHTML/HTML5 内容的模板引擎。类似 JSP,Velocity,FreeMaker 等,它也可以轻易的与 Spring MVC 等Web 框架进行集成作为 Web 应用的模板引擎。与其它模板引擎相比,Thymeleaf 最大的特点是能够直接在浏览器中打开并正确显示模板页面,而不需要启动整个 Web 应用(按 ctrl + F9 重新编译页面)。

Spring Boot 推荐使用 ThymeleafFreemarker 等后现代的模板引擎技术;一但导入相关依赖,会自动配置ThymeleafAutoConfiguration、FreeMarkerAutoConfiguration 等自动配置类。

下图描述了模板引擎的工作原理,模板引擎通过将静态页面和 Model 中的数据结合渲染输出我们需要的页面。如下图所示:
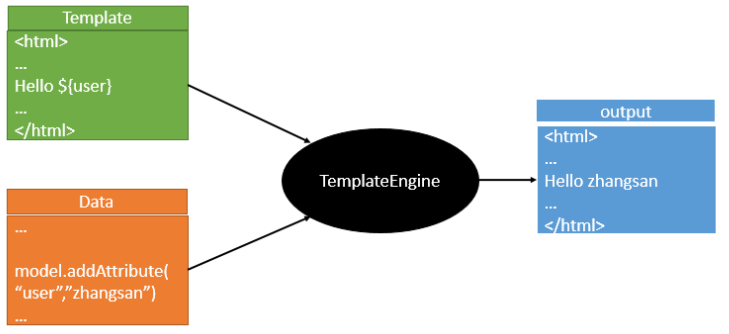
模板引擎工作原理

下面我们介绍一个 SpringBoot 中如何使用 Thymeleaf 吧。

4.1 引入 Thymeleaf

1
2
3
4
5
 <!--导入模板引擎-->
<dependency>
<groupId>org.springframework.boot</groupId>
<artifactId>spring-boot-starter-thymeleaf</artifactId>
</dependency>

4.2 使用 Thymeleaf

我们查看自动配置包中关于模板引擎 Thymeleaf 的自动配置绑定文件类,以下是相关的内容:

1
2
3
4
5
6
7
8
9
@ConfigurationProperties(
prefix = "spring.thymeleaf"
)
public class ThymeleafProperties {
private static final Charset DEFAULT_ENCODING;
public static final String DEFAULT_PREFIX = "classpath:/templates/";
public static final String DEFAULT_SUFFIX = ".html";
...
}

从代码中我们也可以知道 Thymeleaf 模板是存放在 templates 文件夹中的 html 文件,这样 Thymeleaf 就能自动渲染页面。

下面我们来简单的演示一下 Thymeleaf 的使用,首先我们编写如下控制器类 IndexController,具体内容如下:

1
2
3
4
5
6
7
8
9
@Controller
public class IndexController {

@RequestMapping("/index")
public String index(Model model) {
model.addAttribute("hello", "Hello Thymeleaf!");
return "home";
}
}

接着在编写模板文件 home.html,具体内容如下:

1
2
3
4
5
6
7
8
9
10
11
12
<!DOCTYPE html>
<html lang="en" xmlns:th="http://www.thymeleaf.org">
<head>
<meta charset="UTF-8">
<title>Test Thymeleaf</title>
</head>
<body>
<h1>成功!</h1>
<!--th:text 将span里面的文本内容设置为${hello}的内容 -->
<span th:text="${hello}">这段文本将会被替代掉</span>
</body>
</html>

需要注意的是,我们需要导入 Thymeleaf 的名称空间,即<html lang="en" xmlns:th="http://www.thymeleaf.org">。关于该模板引擎的具体使用如语法规则之类的我们可以查看其官方文档

5. 定制web扩展配置

5.1 定制 SpringMVC 配置

SpringBoot 自动配置好了 SpringMVC。以下是 SpringBoot 对 SpringMVC 的一些默认配置,除此之外,我们还介绍了如何自定义 SpringMVC 的一些配置。关于 SpringBoot 对 SpringMVC 自动配置的详细信息,我们可以在自动配置包中的 WebMvcAutoConfiguration 类中找到其中的源码定义。

5.1.1 定制视图解析器

SpringBoot 自动配置了多种视图解析器,包括组合所有的视图解析器的 ContentNegotiatingViewResolver以及解析各种 Bean 的BeanNameViewResolver

我们可以自己给容器中添加一个视图解析器,SpringBoot 会自动的将其组合进来。自定义视图解析器的方法很简单。首先我们需要编写自己的视图解析器类,该类需要实现 ViewResolver 接口,然后重写 resolveViewName 方法。具体如下所示:

1
2
3
4
5
6
7
8
9
10
11
12
/**
* @author 郑松涛
* @version 1.0
* @description 自定义视图解析器
* @date 2019/12/4 10:55
*/
public class MyViewResolver implements ViewResolver {
@Override
public View resolveViewName(String s, Locale locale) throws Exception {
return null;
}
}

接着在配置类中编写一个方法,并将该方法返回的自定义视图解析器对象 MyViewResolver 加入到 IoC 容器中即可。至此,自定义视图解析的添加边完成了。

1
2
3
4
5
6
7
8
9
10
11
12
13
14
/**
* @author 郑松涛
* @version 1.0
* @description 配置类
* @date 2019/12/4 10:56
*/
@Configuration
public class WebConfig {

@Bean
public ViewResolver myViewReolver() {
return new MyViewResolver();
}
}

我们可以在 DispatchServlet 类的 都 doDispatch 方法上打上断点进行测试,其中我们自定义的视图解析器是有起作用的,如下图所示:
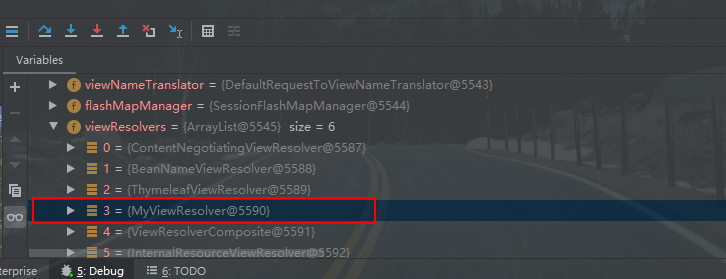
自定义视图解析器

5.1.2 定制转换器和格式化器

SpringBoot 自动注册了 ConverterGenericConverterFormatter等组件,其中 Converter即为转换器,比如请求时可以将表单内容自动封装转换为一个类;Formatter即为格式化器,如对时间的进行格式化等。与自定义视图解析器一样,我们也可以通过同样的方式来自定义转换器和格式化器等。

另外,SpringBoot 还支持 HttpMessageConverters,其是 SpringMVC 用来转换 Http 请求和响应的,比如将 User 转换为 Json 格式。假如我们需要自己给容器中添加 HttpMessageConverter,只需要类似前面自定义视图解析器一样的方法将自己的组件注册容器中即可。示例如下:

1
2
3
4
5
6
7
8
9
10
11
12
13
14
@Configuration(proxyBeanMethods = false)
public class MyConfiguration {

/**
* 创建并自定义自己的HttpMessageConverters
*/
@Bean
public HttpMessageConverters customConverters() {
HttpMessageConverter<?> additional = ...
HttpMessageConverter<?> another = ...
return new HttpMessageConverters(additional, another);
}

}

总结:前面 5.1.1 和 5.1.2 使用的方法都是一样的,都是在配置类中将自定义的类作为组件加入到容器中,这样 SpringBoot 在自动配置很多组件的时候,会先看容器中有没有用户自己配置的(@Bean、@Component)组件。如果有就用用户配置的,如果没有,才自动配置;如果有些组件可以有多个(ViewResolver)则会将用户配置的和自己默认的组合起来。

5.1.3 定制拦截器

与前面使用普通的配置类配置自定义组件不同的是,下面我们使用 WebMvcConfigurer 类型的配置类来实现添加自定义的拦截器。使用这种方法,可以避免用户自定义组件替代 SpringBoot 自动配置组件的情况。相反的,用户自定义配置的组件会和 SpringBoot 自动配置的组件一起其作用。下面我们就以定义拦截器为例演示一下该功能的使用。

首先我们自然需要先编写一个自定义的拦截器类,其需要实现 HandlerInteceptor 接口,并实现需要的方法,如下所示:

1
2
3
4
5
6
7
8
9
10
public class IndexInterceptor implements HandlerInterceptor {
Logger logger = LoggerFactory.getLogger(IndexInterceptor.class);

@Override
public boolean preHandle(HttpServletRequest request, HttpServletResponse response, Object handler) throws Exception {
logger.info("拦截器的 preHandle 方法运行了。。。");
return true;
}

}

接着我们需要编写 WebMvcConfigurer 类型的配置类来注册该拦截器,具体如下所示:

1
2
3
4
5
6
7
8
9
10
11
12
13
14
15
@Configuration
public class WebMvcConfig implements WebMvcConfigurer {

/**
* 注册自定义的拦截器,
* addPathPatterns("/**")表明所有请求都要经过该拦截器
* .excludePathPatterns("/index.html", "/", "/usr/login"); 用于排除这三个请求路径会经过拦截器的拦截
* @param registry
*/
@Override
public void addInterceptors(InterceptorRegistry registry) {
registry.addInterceptor(new LoginInterceptor()).addPathPatterns("/**")
.excludePathPatterns("/index.html", "/", "/usr/login");
}
}

运行之后,我们可以在控制台上发现拦截器的 preHandle 方法运行了。。。的信息被输出了,说明我们拦截器添加成功了。

原理

我们查看 MVC 的自动配置类 WebMvcAutoConfiguration ,该类中的静态内部类 EnableWebMvcConfiguration 的父类 DelegatingWebMvcConfiguration 存在如下代码:

1
2
3
4
5
6
7
8
9
10
11
12
13
14
15
16
17
@Configuration(
proxyBeanMethods = false
)
public class DelegatingWebMvcConfiguration extends WebMvcConfigurationSupport {
private final WebMvcConfigurerComposite configurers = new WebMvcConfigurerComposite();

@Autowired(
required = false
)
public void setConfigurers(List<WebMvcConfigurer> configurers) {
if (!CollectionUtils.isEmpty(configurers)) {
this.configurers.addWebMvcConfigurers(configurers);
}

}
...
}

我们观察 setConfigurers 方法,该方法会从容器中获取所有的 WebMvcConfigurer(含有我们自定义的 WebMvcConfig),并添加到 WebMvcConfigurerComposite 中。最后,我们配置类 WebMvcConfig 中拦截器也会一并被调用执行。

5.2 全面接管 SpringMVC

假如我们不需要 SpringBoot 对 SpringMVC 的自动配置,也就是所有的 SpringMVC 的配置都要我们自己手动配置,我们只需要在配置类中添加 @EnableWebMvc 即可。

原理

为什么 @EnableWebMvc 会使 SpringMVC 的自动配置实效,我们来查看一下其源码,具体如下所示:

1
2
3
4
5
6
@Retention(RetentionPolicy.RUNTIME)
@Target({ElementType.TYPE})
@Documented
@Import({DelegatingWebMvcConfiguration.class})
public @interface EnableWebMvc {
}

我们发现 @EnableWebMvc 本身需要导入 DelegatingWebMvcConfiguration 该类,而 DelegatingWebMvcConfiguration 是 WebMvcConfigurationSupport 的子类。如下所示:

1
2
3
4
5
6
7
public class DelegatingWebMvcConfiguration extends WebMvcConfigurationSupport {
private final WebMvcConfigurerComposite configurers = new WebMvcConfigurerComposite();

public DelegatingWebMvcConfiguration() {
}
...
}

另外,MVC 自动配置类中定义了 @ConditionalOnMissingBean({WebMvcConfigurationSupport.class})。它表明Spring 容器中缺少 WebMvcConfigurationSupport 类时,该自动配置类才会生效。由于前面我们在自定义的配置类中使用了 @EnableWebMvc 注解,该注解会导入 WebMvcConfigurationSupport 该类,所以我们才能全面接管 SpringMVC 的配置。

6. 国际化

步骤:

1)、编写国际化配置文件,抽取页面需要显示的国际化消息
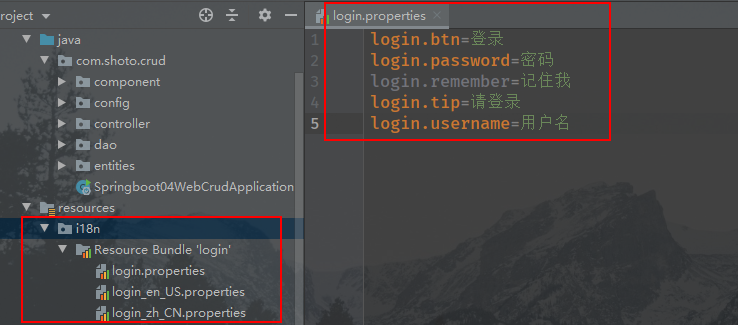
国际化配置文件

2)、SpringBoot 自动配置好了管理国际化资源文件的组件 ResourceBundleMessageSource,所以这一步我们不需要自己配置。

1
2
3
4
5
6
7
8
9
10
11
12
13
14
15
16
17
18
19
20
21
22
@ConfigurationProperties(prefix = "spring.messages")
public class MessageSourceAutoConfiguration {

private String basename = "messages";
//我们的配置文件可以直接放在类路径下叫messages.properties;

@Bean
public MessageSource messageSource() {
ResourceBundleMessageSource messageSource = new ResourceBundleMessageSource();
if (StringUtils.hasText(this.basename)) {
//设置国际化资源文件的基础名(去掉语言国家代码的)
messageSource.setBasenames(StringUtils.commaDelimitedListToStringArray(
StringUtils.trimAllWhitespace(this.basename)));
}
if (this.encoding != null) {
messageSource.setDefaultEncoding(this.encoding.name());
}
messageSource.setFallbackToSystemLocale(this.fallbackToSystemLocale);
messageSource.setCacheSeconds(this.cacheSeconds);
messageSource.setAlwaysUseMessageFormat(this.alwaysUseMessageFormat);
return messageSource;
}

3)、页面获取国际化的值,具体代码如下:

1
2
3
4
5
6
7
8
9
10
<!DOCTYPE html>
<html lang="en" xmlns:th="http://www.thymeleaf.org">
<head>
<meta charset="UTF-8">
<title>测试国际化</title>
</head>
<body>
<label th:text="#{login.username}">用户名</label>
</body>
</html>

4)、在 SpringBoot 的配置文件中配置国际化的命名空间,具体如下所示:

1
2
# 配置命名空间,用于指明国际化文件的位置
spring.messages.basename=i18n.login

最后的效果就是会根据浏览器语言设置的信息切换了国际化。

7. 错误处理机制

7.1 默认错误处理机制

当我们向 SpringBoot 应用发送一个不存在的请求地址的时候,在浏览器中则会显示服务端响应返回一个默认的错误页面,如下所示:

浏览器错误响应页面

不过当我们使用其他客户端向 SpringBoot 应用发送一个不存在的请求地址的时候,比如使用 Postman 发送。此时则会显示服务端发送回来的 Json 数据,例如:

1
2
3
4
5
6
7
{
"timestamp": "2019-01-21T14:36:48.573+0000",
"status": 404,
"error": "Not Found",
"message": "No message available",
"path": "/index.html"
}

我们从各自的发送请求中得到这种差异的原因,比如浏览器的请求头表明其想要接收的数据是 text/html的数据,如下:

浏览器的请求头

相反地,我们使用 Postman 发送的请求的请求头则不是要求接收 text/html类型的数据,具体如下所示:

Postman的请求头

当然这种差异的具体原因我们可以在源码中找到,我们可以参照 ErrorMvcAutoConfiguration 自动配置类的具体内容,该类主要是用于错误处理的自动配置类。这里不再详述。

7.2 自定义错误响应

7.2.1 定制错误页面

1)、在有配置模板引擎的情况下,如果发生指定状态类型的错误时,Springboot 会将模板文件夹里面的 error 文件夹下命名为对应状态码的 错误状态码.html的文件作为自定义的错误页面。比如请求时发生404错误,那么就会将对应的名为404.html文件作为自定义错误页面。

另外,我们也可以使用名为4xx.html5xx.html作为自定义错误页面来匹配这种类型的所有错误,但是如果发生指定状态类型的错误时,会优先寻找名为对应状态码的自定义错误页面。

2)、在没有配置模板引擎或者模板文件夹下没有需要的错误页面的情况下,那么就会在静态资源文件夹下找。

3)、以上的情况下都没有找到需要的错误页面是,就会默认来到 SpringBoot 默认的错误提示页面。

需要说明的是,我们在页面能获取的信息有:

  • timestamp:时间戳
  • status:状态码
  • errors:错误提示
  • exception:异常对象
  • message:异常消息
  • errors:JSR303数据校验的错误都在这里

假如我在 Controller 的 index 方法中故意导致服务器除零异常,具体代码如下所示:

1
2
3
4
5
6
7
8
9
10
@Controller
public class IndexController {

@RequestMapping("/index.html")
public String index() {
// 模拟除〇异常
int i =1 / 0;
return "index";
}
}

使用模板引擎 Thymeleaf 的页面编写示例如下:

1
2
3
4
5
6
7
8
9
10
11
12
13
14
15
16
<!DOCTYPE html>
<html lang="en" xmlns:th="http://www.thymeleaf.org">
<head>
<meta charset="UTF-8">
<title>错误响应页面</title>
</head>
<body>
<h1>错误消息:</h1>
<p th:text="${timestamp}"></p>
<p th:text="${status}"></p>
<p th:text="${error}"></p>
<p th:text="${exception}"></p>
<p th:text="${message}"></p>
<p th:text="${errors}">JSR303数据校验错误</p>
</body>
</html>

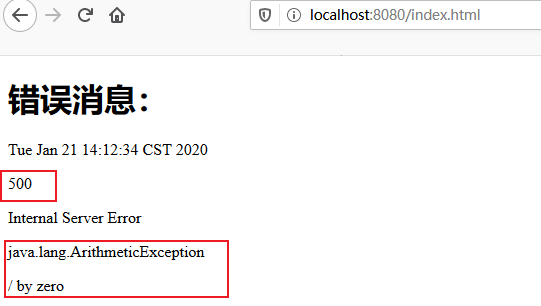
运行测试之后,浏览器页面上的异常信息显示具体如下图所示:

1579587179589

7.2.2 自定义错误响应数据

当出现错误的时候,框架底层会进行 /error 请求,然后被 BasicErrorController 处理,其中异常响应出去的数据是由 getErrorAttributes 得到的。该方法是 AbstractErrorController 或 ErrorController 规定的方法:

  1. 完全自己编写一个 ErrorController 的实现类(或编写 AbstractErrorController 的子类),并加入到 IoC 容器中;

  2. 页面上显示的异常响应数据,或者是 Json 返回的异常响应数据都是通过 ErrorAttributes.getErrorAttributes 方法得到的。

下面,我们自定义 ErrorAttributes 类,具体如下所示:

1
2
3
4
5
6
7
8
9
10
@Component
public class MyErrorAttributes extends DefaultErrorAttributes {

@Override
public Map<String, Object> getErrorAttributes(RequestAttributes requestAttributes, boolean includeStackTrace) {
Map<String, Object> map = super.getErrorAttributes(requestAttributes, includeStackTrace);
map.put("shoto", "郑松涛自定义异常信息!");
return map;
}
}

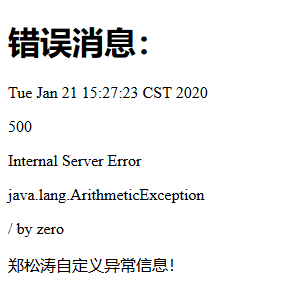
同样的,当 Controller 的 index 方法发生除零异常的时候,页面会显示自定义异常响应信息,如下图所示:
1579592581505

8. 配置嵌入式Servlet容器

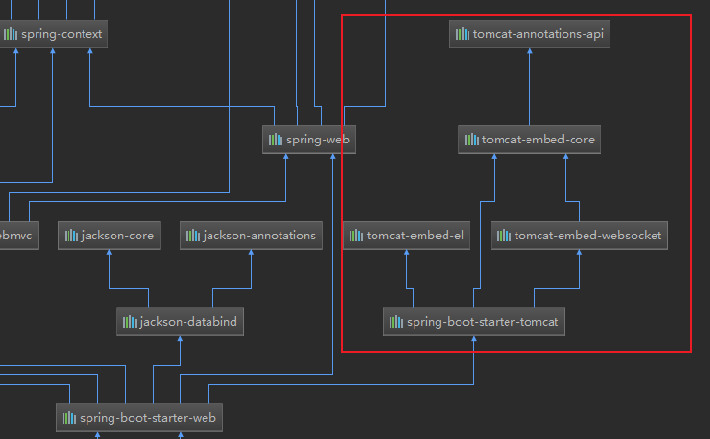
SpringBoot 默认使用 Tomcat 作为嵌入式的 Servlet 容,如下图所示。开发时,我们可以根据自身需要更改 Tomcat 的 Servlet 容器配置。
1579593804258

8.1 定制或配置 Servlet 容器

  1. 修改和 server 有关的配置,其中 application.propertise 中可以配置的内容我们可以从 ServerProperties 类中找到。具体配置的实现可以从 EmbeddedServletContainerCustomizer 接口的之类找到。

    1
    2
    3
    4
    5
    6
    # 通用的Servlet容器设置
    # server.xxx
    # Tomcat的设置
    # server.tomcat.xxx
    server.port=8080
    server.tomcat.uri-encoding=UTF-8
  2. 编写一个 EmbeddedServletContainerCustomizer,即 SpringBoot 提供的一个嵌入式的 Servlet 容器定制器,同样也是用来修改 Servlet 容器的配置。具体代码如下所示:

    1
    2
    3
    4
    5
    6
    7
    8
    9
    10
    11
    12
    13
    14
    15
    16
    17
    18
    19
    20
    21
    22
    @Configuration
    public class ServletConfiguration {

    @Bean
    public EmbeddedServletContainerCustomizer embeddedServletContainerCustomizer() {
    return new EmbeddedServletContainerCustomizer() {

    /**
    * 定制嵌入式的Servlet容器相关的规则,比如设置端口号
    * @param container
    */
    @Override
    public void customize(ConfigurableEmbeddedServletContainer container) {
    // 设置访问端口
    container.setPort(8081);
    // 设置访问路径
    container.setContextPath("/shoto");
    }
    };
    }

    }
  3. 测试结果如下所示

    1579594639211

8.2 注册 Servlet、Filter、Listener

由于 SpringBoot 默认是以 jar 包的方式启动嵌入式的 Servlet 容器来启动 SpringBoot 的 web 应用,因此没有 web.xml 文件,我们便也就数不能在 web.xml 文件中注册 Servlet、Filter 和 Listener。下面讲一下 SpringBoot 是如何进行这三大组件的注册的。

8.2.1 注册Servlet

  1. 首先编写一个自定义的 Servlet,部分代码如下所示:
1
2
3
4
5
6
7
8
9
10
public class MyServlet implements Servlet {

private static final Logger logger = LoggerFactory.getLogger(MyServlet.class);

@Override
public void init(ServletConfig servletConfig) throws ServletException {
logger.info("MyServlet 初始化啦....");
}
...
}
  1. 然后在配置类中编写如下代码,这里使用到了FilterRegistrationBean 类,具体代码如下所示:
1
2
3
4
5
@Bean
public ServletRegistrationBean myServlet(){
ServletRegistrationBean registrationBean = new ServletRegistrationBean(new MyServlet(),"/myServlet");
return registrationBean;
}
  1. 接着在浏览器中访问http:/localhost:8080/MyServlet,此时 MyServlet 会开始进行初始化,也就是 MyServlet 中的 init 方法会开始执行。

8.2.2 注册 Filter

  1. 首先编写一个 Filter。

  2. 然后在配置类中编写如下代码,这里使用到了FilterRegistrationBean 类,具体代码如下所示:

1
2
3
4
5
6
7
@Bean
public FilterRegistrationBean myFilter(){
FilterRegistrationBean registrationBean = new FilterRegistrationBean();
registrationBean.setFilter(new MyFilter());
registrationBean.setUrlPatterns(Arrays.asList("/hello","/myServlet"));
return registrationBean;
}

8.2.4 注册 Listener

使用 ServletListenerRegistrationBean 类:

1
2
3
4
5
@Bean
public ServletListenerRegistrationBean myListener(){
ServletListenerRegistrationBean<MyListener> registrationBean = new ServletListenerRegistrationBean<>(new MyListener());
return registrationBean;
}

SpringBoot 帮我们自动装载 SpringMVC 的时候,自动的注册 SpringMVC 的前端控制器,即 DIspatcherServlet。

DispatcherServletAutoConfiguration中:

1
2
3
4
5
6
7
8
9
10
11
12
13
14
15
16
17
@Bean(name = DEFAULT_DISPATCHER_SERVLET_REGISTRATION_BEAN_NAME)
@ConditionalOnBean(value = DispatcherServlet.class, name = DEFAULT_DISPATCHER_SERVLET_BEAN_NAME)
public ServletRegistrationBean dispatcherServletRegistration(
DispatcherServlet dispatcherServlet) {
ServletRegistrationBean registration = new ServletRegistrationBean(
dispatcherServlet, this.serverProperties.getServletMapping());
//默认拦截: / 所有请求;包静态资源,但是不拦截jsp请求; /*会拦截jsp
//可以通过server.servletPath来修改SpringMVC前端控制器默认拦截的请求路径

registration.setName(DEFAULT_DISPATCHER_SERVLET_BEAN_NAME);
registration.setLoadOnStartup(
this.webMvcProperties.getServlet().getLoadOnStartup());
if (this.multipartConfig != null) {
registration.setMultipartConfig(this.multipartConfig);
}
return registration;
}

9. 使用外置的Servlet容器

SpringBoot 默认支持的是嵌入式 Servlet 容器,因此应用打成可执行的 Jar。这样的优点是简单和便携。但是缺点就是默认不支持 JSP,而且优化定制也比较复杂。

下面我们来为 SpringBoot 配置外置的 Servlet 容器,以使 SpringBoot 能够兼容 JSP 且支持 SpringBoot 应用以 war 包的方式进行打包。

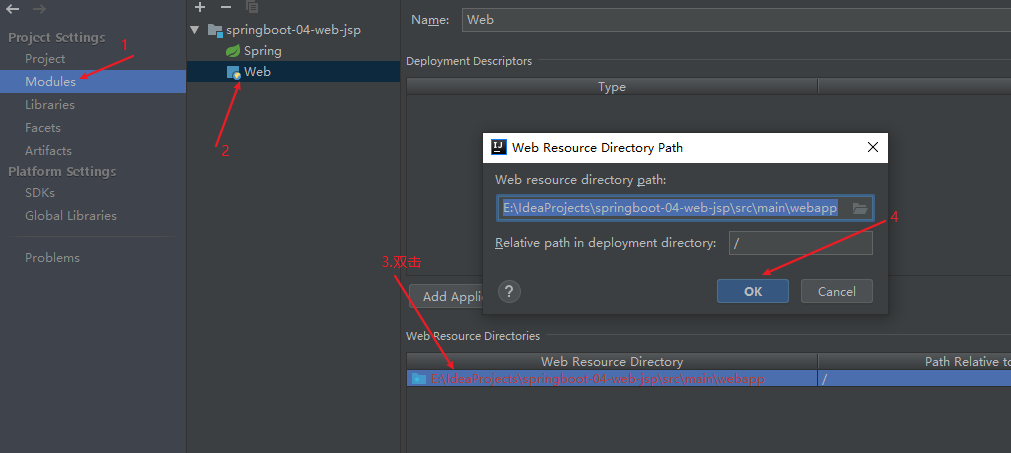
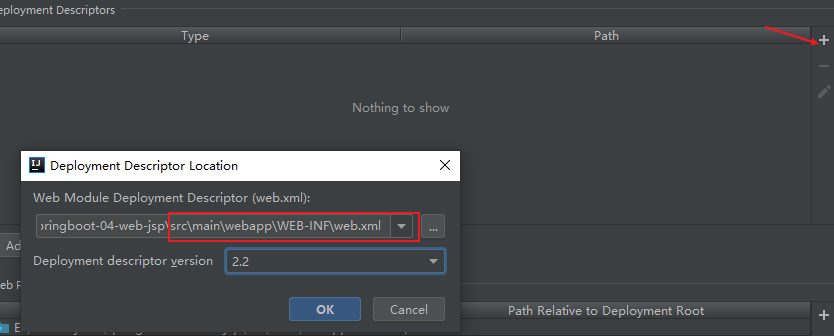
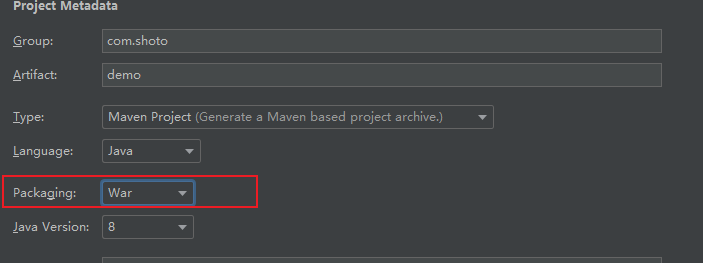
1.首先是先创建一个war项目,并创建好目录结构,需要注意的关键步骤如下所示:
1582708126544

1582708935401

1582709251343

2.IDEA 中配置 Tomcat 启动容器,配置后的结果如下所示:

1582709605061

3.接着需要确保 POM.xml 文件中进行了如下依赖的配置,具体如下所示:

1
2
3
4
5
 <dependency>
<groupId>org.springframework.boot</groupId>
<artifactId>spring-boot-starter-tomcat</artifactId>
<scope>provided</scope>
</dependency>

4.然后需要注意的是 SpringBootApplication 主程序所在的包下是否生成 ServletInitializer 类,该类是一个核心类,具体内容如下所示:

1
2
3
4
5
6
7
8
9
public class ServletInitializer extends SpringBootServletInitializer {

@Override
protected SpringApplicationBuilder configure(SpringApplicationBuilder application) {
//传入SpringBoot应用的主程序
return application.sources(Springboot04WebJspApplication.class);
}

}

5.最后我们可以在 webapp 目录下编写如下两个 jsp 文件,分别是 hello.jsp 和 success.jsp,具体内容如下:

1
2
3
4
5
6
7
8
9
10
<%@ page contentType="text/html;charset=UTF-8" language="java" %>
<html>
<head>
<title>Title</title>
</head>
<body>
<h1>Hello JSP</h1>
<a href="abc">点击</a>
</body>
</html>
1
2
3
4
5
6
7
8
9
<%@ page contentType="text/html;charset=UTF-8" language="java" %>
<html>
<head>
<title>Title</title>
</head>
<body>
<h1>SUCCESS</h1>
</body>
</html>

6.然后编写一个 HelloController 类,具体内容如下所示:

1
2
3
4
5
6
7
8
9
@Controller
public class HelloContoller {

@GetMapping("/abc")
public String hello() {
// 跳转到 success.jsp 页面
return "success";
}
}

7.最后一步是在 application.properties 配置文件中进行配置,即配置 jsp 文件的前缀和后缀,具体如下所示:

1
2
spring.mvc.view.prefix=/WEB-INF/
spring.mvc.view.suffix=.jsp

如此 SpringBoot 便可以兼容 JSP 页面了,SpringBoot 使用外置的 Servlet 容器便完成了。

------ 本文结束------